章工运维 章工运维
首页
  • linux
  • windows
  • 中间件
  • 监控
  • 网络
  • 存储
  • 安全
  • 防火墙
  • 数据库
  • 系统
  • docker
  • 运维工具
  • other
  • elk
  • K8S
  • ansible
  • Jenkins
  • GitLabCI_CD
  • 随笔
  • 面试
  • 工具
  • 收藏夹
  • Shell
  • python
  • golang
友链
  • 索引

    • 分类
    • 标签
    • 归档
    • 首页 (opens new window)
    • 关于我 (opens new window)
    • 图床 (opens new window)
    • 评论 (opens new window)
    • 导航栏 (opens new window)
周刊
GitHub (opens new window)

章工运维

业精于勤,荒于嬉
首页
  • linux
  • windows
  • 中间件
  • 监控
  • 网络
  • 存储
  • 安全
  • 防火墙
  • 数据库
  • 系统
  • docker
  • 运维工具
  • other
  • elk
  • K8S
  • ansible
  • Jenkins
  • GitLabCI_CD
  • 随笔
  • 面试
  • 工具
  • 收藏夹
  • Shell
  • python
  • golang
友链
  • 索引

    • 分类
    • 标签
    • 归档
    • 首页 (opens new window)
    • 关于我 (opens new window)
    • 图床 (opens new window)
    • 评论 (opens new window)
    • 导航栏 (opens new window)
周刊
GitHub (opens new window)
  • ansible系列文章

  • Kubernetes笔记

  • elk

    • elk安装
    • docker-compose安装elk
    • filebeat-log相关配置指南
    • logstash提取日志字段到kibana仪表盘展示
    • 深入理解 ELK 中 Logstash 的底层原理
    • filebeat及logstash配置
    • es索引定期删除脚本
    • logstash线上配置文件
    • elk报错问题总结
    • es备份和还原
    • ES集群与角色规划
    • ES8.8集群与Kibana部署
    • ElasticSearch可视化工具介绍
      • 使用docker构建ElasticSearch集群
    • jenkins

    • GitLabCI_CD

    • 专题
    • elk
    章工运维
    2024-04-16
    目录

    ElasticSearch可视化工具介绍

    # 一、elasticsearch-head
    # 1、拉取镜像
    docker pull mobz/elasticsearch-head:5
    docker tag docker.io/mobz/elasticsearch-head:5 es_head
    docker rmi docker.io/mobz/elasticsearch-head:5
    
    1
    2
    3
    # 2、创建容器
    docker run -itd --name es_head -p 9100:9100 es_head
    
    1
    # 3、访问 192.168.78.200:9100

    # 4、通过postman添加为es集群添加一个索引
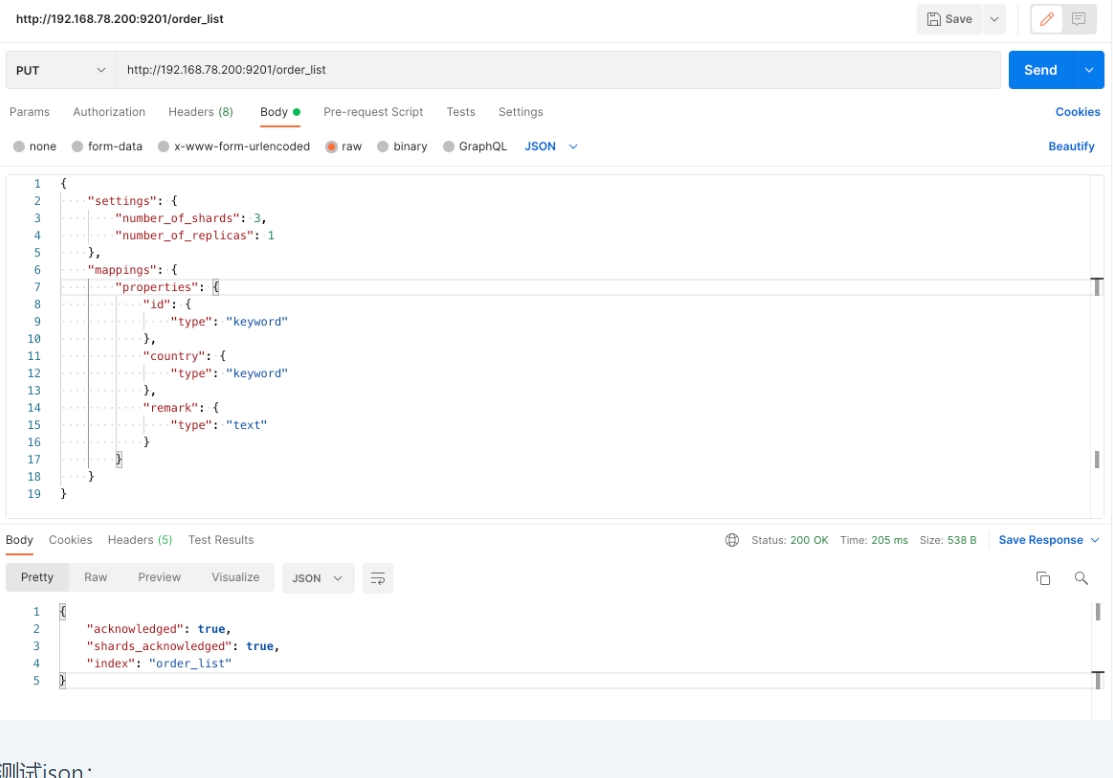
    测试json:

    {
        "settings": {
            "number_of_shards": 3,
            "number_of_replicas": 1
        },
        "mappings": {
            "properties": {
                "id": {
                    "type": "keyword"
                },
                "country": {
                    "type": "keyword"
                },
                "remark": {
                    "type": "text"
                }
            }
        }
    }
    
    1
    2
    3
    4
    5
    6
    7
    8
    9
    10
    11
    12
    13
    14
    15
    16
    17
    18
    19
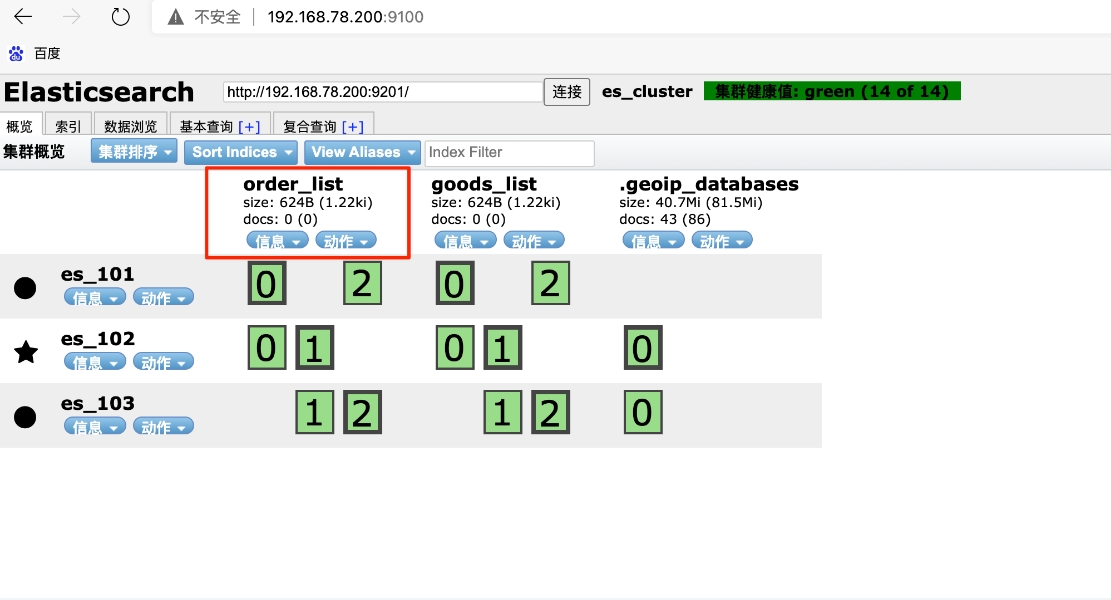
    # 5、我们再访问192.168.78.200:9100,查看结果:

    # 6、总结及注意

    通过elasticsearch-head,我们可以清晰看到数据分片情况,这点是kibana做不到的,后续使用时会有深刻感受,二者结合才是王道。

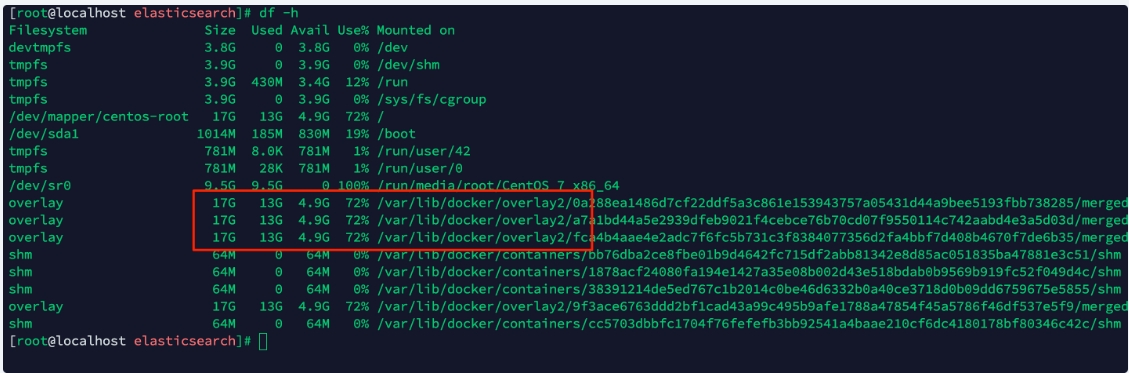
    注意:如果这一步没有添加成功,返回结果是{ "acknowledged": true, "shards_acknowledged": false} ,那很有可能是磁盘空间不足了。

    使用df -h命令查看一下,超过95%使用率,es就不会再允许往es里写数据了。

    # 二、kibana
    # 1、拉取镜像
    docker pull kibana:7.14.1
    docker tag docker.io/kibana:7.14.1 kibana
    docker rmi docker.io/kibana:7.14.1
    
    1
    2
    3
    # 2、创建容器
    docker run -itd --name kibana --network elasticsearch_default --link es_101:elasticsearch -p 5800:5601 kibana
    
    1

    注意,我这里指定了kibana容器和es集群的三个容器使用了同一个网络,所以可以直接用容器名做外连,将kibana内部配置文件中的elasticsearch直接解析为es_101。

    如果不指定使用es的网络,则需要进入容器内配置ElasticSearch的实际ip地址
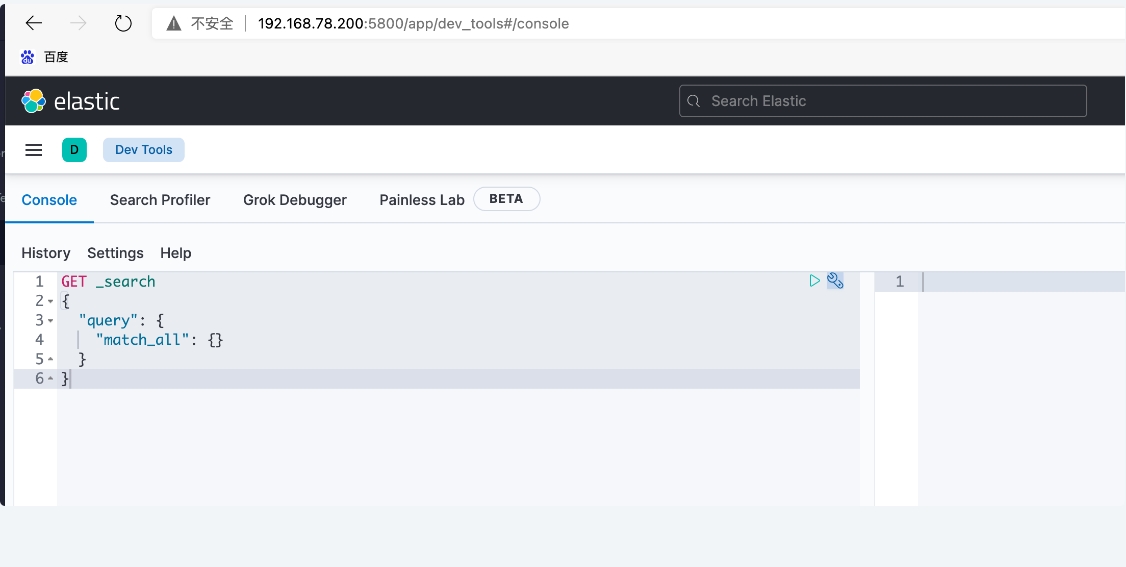
    # 3、查看结果

    访问 http://192.168.78.200:5800/app/dev_tools#/console
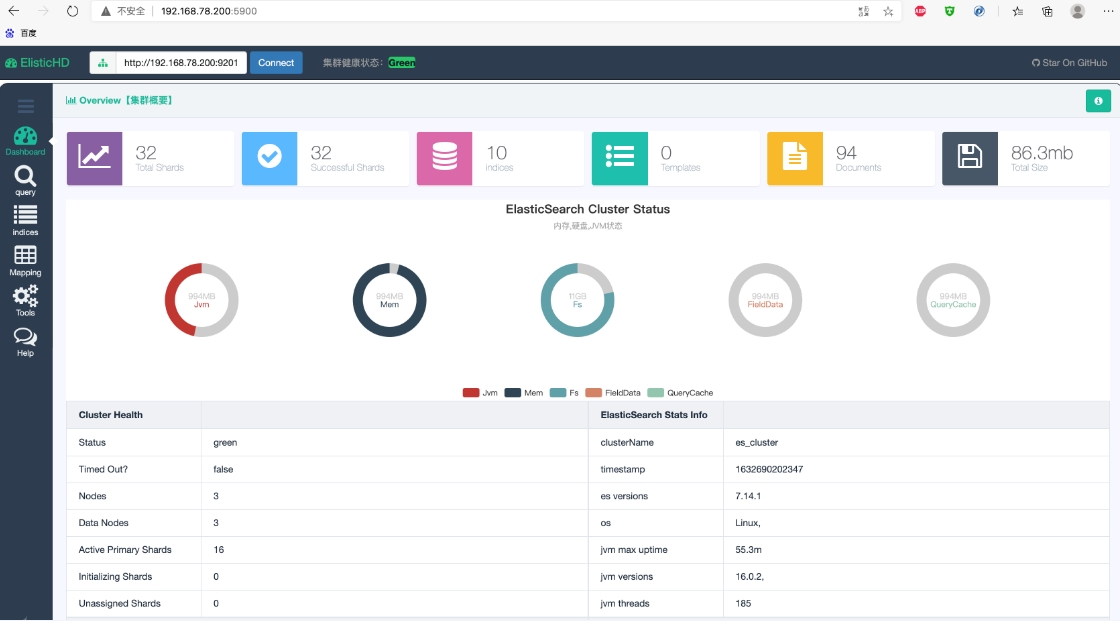
    # 三、elasticHD
    # 1、下载镜像
    docker pull containerize/elastichd
    docker tag docker.io/containerize/elastichd elastichd
    docker rmi docker.io/containerize/elastichd
    
    1
    2
    3
    # 2、创建容器
    docker run -p 5900:9800 -d --network elasticsearch_default --link es_101:demo elastichd
    
    1
    # 3、查看结果

    访问 http://192.168.78.200:5900 (opens new window)


    原文链接 (opens new window)

    微信 支付宝
    上次更新: 2024/04/16, 17:30:00

    ← ES8.8集群与Kibana部署 使用docker构建ElasticSearch集群→

    最近更新
    01
    不花一分钱从0到1建站教程
    04-22
    02
    批量拿取多台服务器的日志文件
    04-21
    03
    高德MCP智能体搞定旅游计划
    04-19
    更多文章>
    Theme by Vdoing | Copyright © 2019-2025 | 点击查看十年之约 | 鄂ICP备2024072800号
    • 跟随系统
    • 浅色模式
    • 深色模式
    • 阅读模式